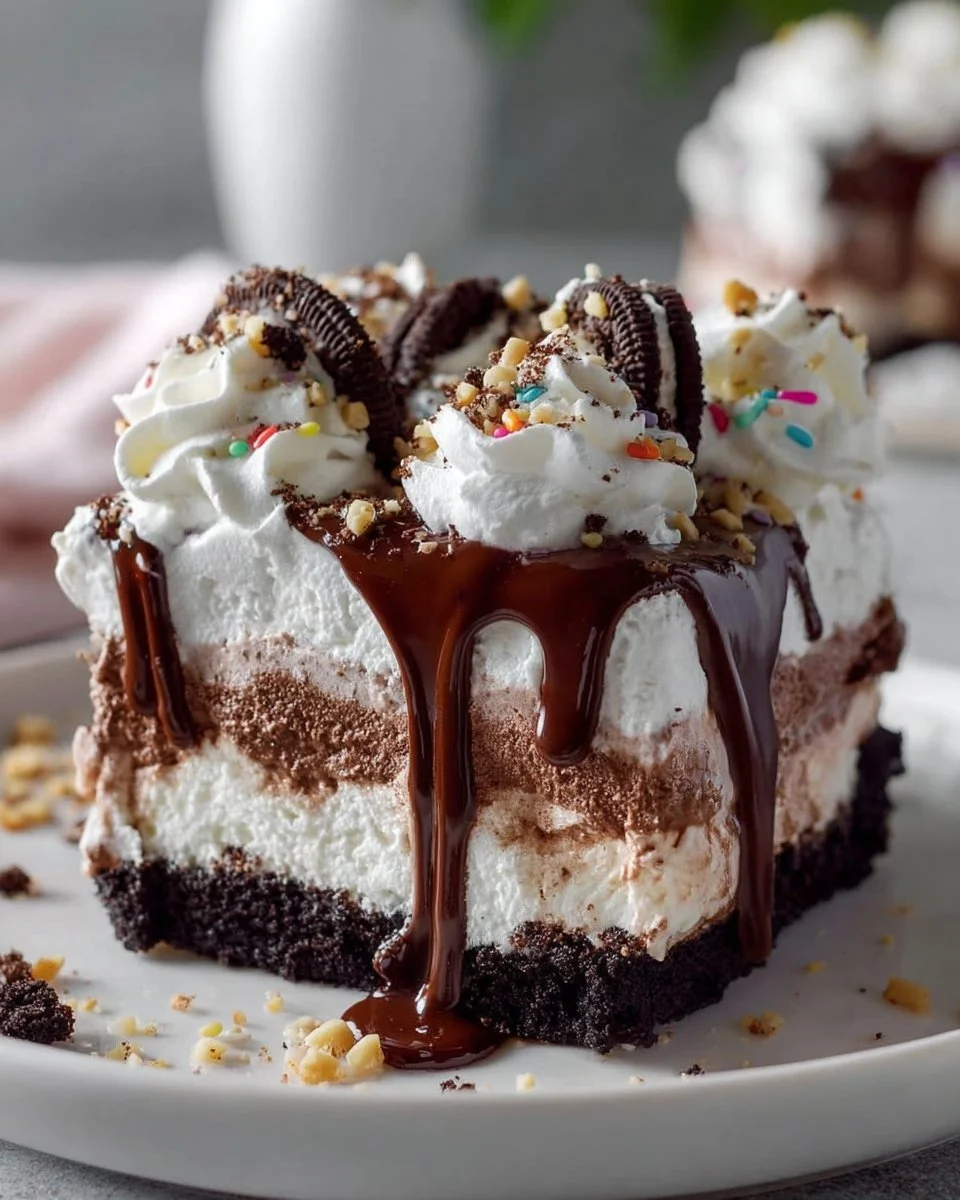
The scene is set: a warm, sunny afternoon, and you find yourself surrounded by friends and family, laughter dancing through the air. The moment everyone has been waiting for has arrived. As you slice into the luscious layers of your homemade ice cream cake, the cool, creamy interior reveals itself. Its texture, a perfect harmony of soft ice cream and crumbly cookie crust, beckons your spoon. Each bite melds the rich flavors of chocolate and vanilla, swirling together like a sweet summer breeze. With each mouthful, a feeling of nostalgia washes over you, taking you back to those childhood visits to the beloved Dairy Queen, where your heart would skip a beat in anticipation of that cool treat.
Creating your own copycat Dairy Queen Ice Cream Cake at home is not just a baking adventure; it’s a celebration of memory, flavor, and happiness all rolled into one delicious dessert. As you take that first bite, the delightful crunch of Oreo cookie crust contrasts with the silky smoothness of the ice cream, giving way to a drizzle of rich chocolate syrup that makes your taste buds sing. The whipped cream topping and optional crushed nuts add a dreamy finish, inviting seconds that you can’t resist.
There’s something magical about this cake; it’s versatile, celebratory, and endlessly customizable. Whether for a birthday party, a family gathering, or just a sunny afternoon treat, this cake will undoubtedly be a hitting centerpiece that draws everyone together. Let’s dive deeper into the delightful specifics of this crowd-pleasing creation.
Why You’ll Love This Copycat Dairy Queen Ice Cream Cake
This dessert isn’t just a cake; it’s a joy-filled experience. The combination of your favorite ice cream flavors layered between a crunchy Oreo base makes for an unforgettable bite. You can tailor it to suit any occasion or flavor preference. Craving mint chocolate chip? Go for it! Are you more of a cookies and cream enthusiast? This recipe embraces that too.
Crafting this ice cream cake offers numerous benefits beyond taste. It gives you the satisfaction of homemade goodness without the bakery price tag, and the pride that comes from serving a dessert you created from scratch. Additionally, because it’s made ahead and stored in the freezer, it’s ideal for last-minute parties or family get-togethers. With just a bit of prep, you’ll unveil a show-stopping dessert that elicits smiles and eager taste buds.
Preparation Phase & Tools to Use
Creating this ice cream cake involves a few simple yet essential tools to make the process as seamless as possible.
-
Food Processor or Rolling Pin: Crushing the Oreo cookies is made easy with a food processor, but a rolling pin will work if you prefer a more hands-on approach. Just place the Oreos in a zip-top bag and roll until finely crushed.
-
Springform Pan: This pan is perfect for layered desserts like this one. It allows for easy removal, showcasing your beautiful cake without any mess.
-
Mixing Bowl: You’ll need a sturdy bowl to mix your Oreo crumbs and melted butter. A glass bowl can be especially useful, allowing you to see the texture of the mixture.
-
Spatula: Use this to spread the ice cream evenly into the pan, ensuring each layer is smooth and enticing.
Preparation tips: Make sure to soften your chosen ice cream flavors for easier spreading but be cautious not to let them melt too much. If you’re pressed for time, choose similar flavors for a quicker assembly.
Ingredients for Copycat Dairy Queen Ice Cream Cake
-
2 pints of ice cream (your favorite flavors): The star of the show. Choose creamy flavors like vanilla, chocolate, or any of your favorites. For a unique twist, consider seasonal ice creams like pumpkin spice or peppermint during the holidays.
-
1 package of Oreo cookies: These bring classic crunch and a rich chocolate flavor that complements the creaminess of the ice cream perfectly.
-
1/2 cup of chocolate syrup: The drizzle of chocolate syrup boosts flavor with its sweet, rich taste.
-
1/2 cup of whipped cream: This adds a light, airy topping that makes the cake even more decadent.
-
1/4 cup of crushed nuts (optional): Textural contrast can be delightful. Chopped pecans or walnuts work beautifully, but feel free to skip it if you’re not a nut fan.
How to Make Copycat Dairy Queen Ice Cream Cake
-
Crush the Oreos: Begin by placing the Oreo cookies in a food processor or a zip-top bag. Crush them until they reach a fine crumb texture, perfect for creating a solid base.
-
Combine with Butter: In a mixing bowl, mix the Oreo crumbs with melted butter until well combined. The mixture should be moist but crumbly.
-
Form the Crust: Press the Oreo and butter mixture into the bottom of a springform pan. Use the back of a measuring cup for an even layer. Freeze this crust for about 10 minutes to set.
-
Add the Ice Cream: Scoop one pint of your favorite ice cream into the crust, smoothing it out with a spatula.
-
Drizzle Chocolate Syrup: Once the first layer is laid down, drizzle chocolate syrup atop the ice cream. For a creamier layer, feel free to add some whipped cream on top.
-
Freeze Again: Pop the cake back in the freezer for 15-20 minutes to let the first layer firm up.
-
Layer More Ice Cream: Add the second pint of ice cream on top of the set layer, smoothing it to the edges.
-
Final Freeze: Allow the cake to freeze until firm for about 2 hours.
-
Decorate & Serve: Before serving, adorn the top with whipped cream and sprinkle on crushed nuts for added texture.
Chef’s Notes & Helpful Tips
-
Make-ahead Tips: This cake can be assembled up to two days in advance. Just keep it covered in the freezer.
-
Cooking Alternatives: While this recipe is best made in a freezer, if you want to experiment, a silicone mold can create fun shapes. Ensure you freeze it long enough for a sturdy cake.
-
Customization Ideas: Play with flavors and inclusions! Consider blending in candy bars, or other frozen treats for diverse flavors and textures. Want some zest? Add citrus zest into the ice cream layer!
Common Mistakes to Avoid
-
Softening Ice Cream Too Much: If your ice cream is too soft before layering, it might meld into the crust and lose its distinct layers. Let it soften just enough for easy spreading.
-
Not Freezing Long Enough: Each layer needs to be adequately frozen before adding the next. Rushing this step can lead to a slushy mess instead of a beautifully defined cake.
-
Overpacking the Crust: While it’s tempting, avoid pressing the crust too hard, which can make it tough. A gentle, even pressure is key.
-
Forgetting to Line Your Pan: If your pan isn’t release-worthy, use parchment at the bottom to ensure easy extraction.
What to Serve With Copycat Dairy Queen Ice Cream Cake
To elevate your ice cream cake experience, consider these delightful pairings:
-
Fresh Berries: Strawberries or raspberries add a refreshing burst of acidity that cuts through the creaminess.
-
Chocolate Sauce: A drizzle of warm chocolate sauce takes the dessert over the top, amplifying the chocolate experience.
-
Coffee or Espresso: The rich aroma and flavor of coffee create a perfect contrast to the sweet treat.
-
A Scoop of Sorbet: A light, fruity sorbet can cleanse the palate between bites, enhancing the icy experience.
-
Whipped Cream: A dollop of fresh whipped cream offers an extra layer of decadence.
-
Fudge Brownies: Serve a small brownie on the side for chocolate lovers, creating a layered flavor experience.
-
Chopped Fruits: Bananas or apple slices provide a fresh and nutty complement, adding a bit of crunch or texture.
-
Ice Cream Sandwiches: Get creative by using this ice cream cake as a filling between cookies or even another cake layer.
Storage & Reheating Instructions
Store your ice cream cake in the freezer, wrapped in plastic wrap or aluminum foil to maintain its freshness. It can last up to a week in the freezer without losing its flavor or texture. Should you have any slices left, it’s best to portion them out before refreezing as they are easier to enjoy whenever that sweet craving strikes.
Do not attempt reheating; this cake shines best when served frozen. Just slice it straight from the freezer and let it sit for a few moments at room temperature before enjoying.
Estimated Nutrition Information
While indulgent, a slice of this delight will generally provide approximately:
- Calories: 320
- Total Fat: 15g
- Saturated Fat: 9g
- Cholesterol: 65mg
- Sodium: 170mg
- Total Carbohydrates: 42g
- Sugars: 30g
- Protein: 5g
These values depend substantially on the specific ice cream flavors and toppings you choose.
FAQs
1. Can I use homemade ice cream?
Absolutely! Homemade ice cream adds a personal touch and ensures freshness in each layer. Just ensure it’s of a similar texture for best layering.
2. What if I don’t have a springform pan?
While a springform pan is ideal, you can use a regular round cake pan. Just line it with parchment paper to aid in smooth removal.
3. How do I soften ice cream quickly?
Set your ice cream out for about 10-15 minutes at room temperature to soften. However, avoid letting it melt too much; you want a scoopable texture.
4. Is it possible to make this cake dairy-free?
Yes! Look for dairy-free ice creams made from coconut, almonds, or soy. Substitute the whipped cream with a non-dairy alternative, and you’ll have a delicious treat for everyone!
5. How can I prevent the Oreo crust from getting too hard?
Ensure that you are using the right butter quantity, mixing thoroughly, and not packing it too tightly in the pan. This way, it remains crunchy but not rock-hard.
Conclusion
Creating your own Copycat Dairy Queen Ice Cream Cake is not only about indulging your sweet tooth; it’s about crafting an experience that brings people together. Each layer holds the promise of nostalgia and delight, while every slice unveils a beautiful tapestry of flavors waiting to be enjoyed. Serve it up at your next gathering, or simply treat yourself on a quiet evening, and let this delicious cake become a cherished part of your culinary repertoire. Gather your ingredients, summon your inner pastry chef, and dive into this sweet adventure—you’ll be counting down the hours until this cake is ready to shine on your table.
Print
Copycat Dairy Queen Ice Cream Cake
- Prep Time: 20 minutes
- Cook Time: 0 minutes
- Total Time: 140 minutes
- Yield: 8 servings 1x
- Category: Dessert
- Method: Freezing
- Cuisine: American
- Diet: Vegetarian
Description
Indulge in the nostalgic flavors of this Copycat Dairy Queen Ice Cream Cake, featuring layers of creamy ice cream and a crunchy Oreo cookie crust.
Ingredients
- 2 pints of ice cream (your favorite flavors)
- 1 package of Oreo cookies
- 1/2 cup of chocolate syrup
- 1/2 cup of whipped cream
- 1/4 cup of crushed nuts (optional)
Instructions
- Crush the Oreos: Place the Oreo cookies in a food processor or a zip-top bag and crush them until fine.
- Combine with Butter: In a mixing bowl, mix the Oreo crumbs with melted butter until well combined.
- Form the Crust: Press the mixture into the bottom of a springform pan and freeze for about 10 minutes.
- Add the Ice Cream: Scoop one pint of ice cream into the crust, smoothing it out.
- Drizzle Chocolate Syrup: Top the ice cream with chocolate syrup and optional whipped cream.
- Freeze Again: Return the cake to the freezer for 15-20 minutes to firm the first layer.
- Layer More Ice Cream: Add the second pint of ice cream on top and smooth it out.
- Final Freeze: Allow the cake to freeze until firm for about 2 hours.
- Decorate & Serve: Before serving, top with whipped cream and sprinkle on crushed nuts.
Notes
Make ahead up to two days in advance and keep covered in the freezer. Customize with different ice cream flavors or toppings as desired.
Nutrition
- Serving Size: 1 slice
- Calories: 320
- Sugar: 30g
- Sodium: 170mg
- Fat: 15g
- Saturated Fat: 9g
- Unsaturated Fat: 6g
- Trans Fat: 0g
- Carbohydrates: 42g
- Fiber: 1g
- Protein: 5g
- Cholesterol: 65mg