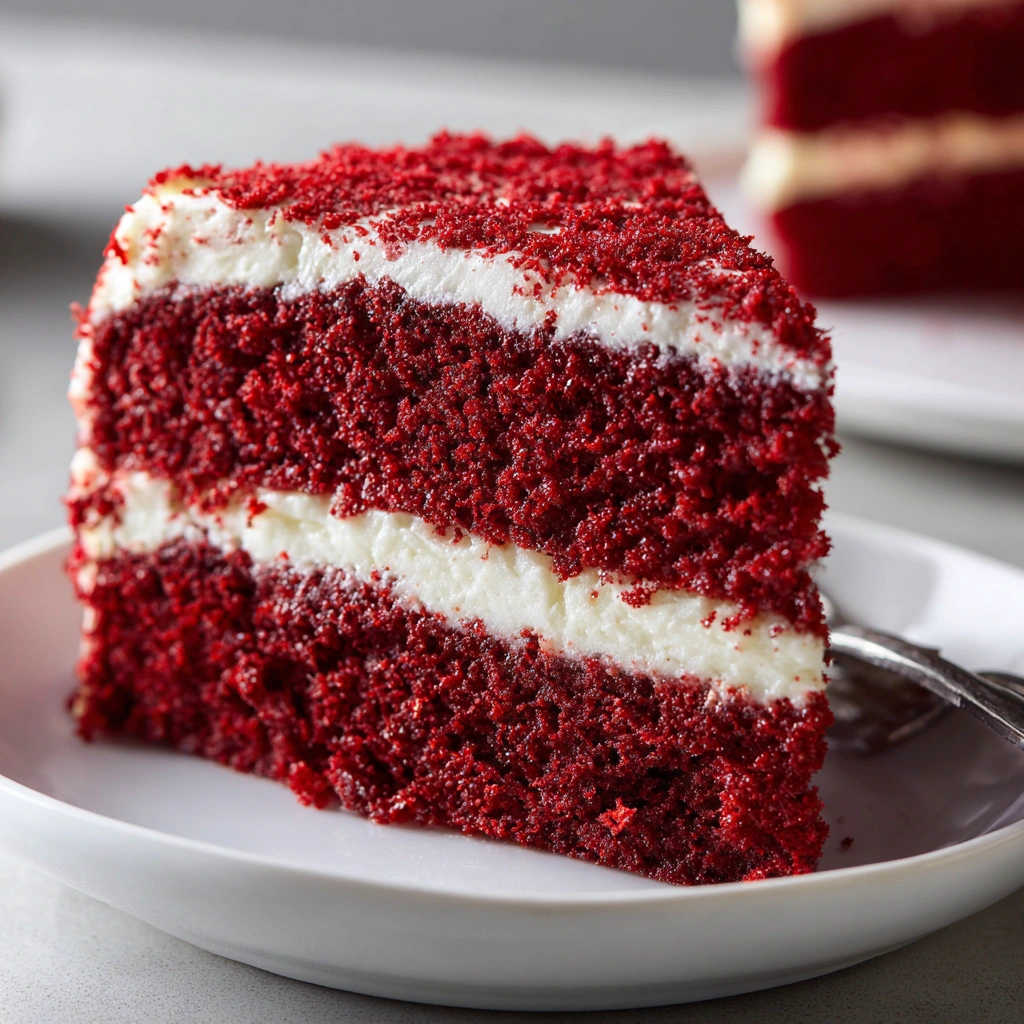
Introduction to Red Velvet Honeybun Cake with Cinnamon Cream Cheese Icing
As a busy mom, I know how precious time can be, especially when it comes to baking. That’s why I absolutely adore this Red Velvet Honeybun Cake with Cinnamon Cream Cheese Icing. It’s not just a cake; it’s a delightful experience that brings joy to any gathering. Imagine a moist, velvety cake swirled with a warm cinnamon filling, topped with creamy icing that melts in your mouth. This recipe is perfect for impressing loved ones or simply treating yourself after a long day. Trust me, once you try it, you’ll want to make it again and again!
Why You’ll Love This Red Velvet Honeybun Cake with Cinnamon Cream Cheese Icing
This Red Velvet Honeybun Cake with Cinnamon Cream Cheese Icing is a game-changer for busy days. It’s incredibly easy to whip up, taking just about an hour from start to finish. The rich, velvety flavor combined with the warm cinnamon swirl makes it a crowd-pleaser. Plus, the creamy icing adds a touch of indulgence that feels special, even on a hectic weeknight. You’ll love how it brightens up any occasion!
Ingredients for Red Velvet Honeybun Cake with Cinnamon Cream Cheese Icing
Gathering the right ingredients is the first step to creating this delightful Red Velvet Honeybun Cake with Cinnamon Cream Cheese Icing. Here’s what you’ll need:
- All-purpose flour: The backbone of the cake, providing structure and texture.
- Granulated sugar: Sweetens the cake and helps create that lovely moist crumb.
- Baking soda: This leavening agent gives the cake its lift, making it light and fluffy.
- Salt: Enhances the flavors and balances the sweetness.
- Cocoa powder: Just a hint adds depth to the flavor without overpowering the red velvet essence.
- Vegetable oil: Keeps the cake moist and tender; you can substitute with melted butter for a richer taste.
- Buttermilk: Adds tanginess and moisture, making the cake incredibly soft. If you don’t have buttermilk, mix milk with a splash of vinegar.
- Large eggs: Bind the ingredients together and contribute to the cake’s richness.
- Red food coloring: Gives the cake its signature vibrant hue. You can use natural alternatives like beet juice if you prefer.
- Vanilla extract: A must for flavor; it adds warmth and sweetness.
- White vinegar: Reacts with the baking soda to create a fluffy texture.
- Brown sugar: Adds a hint of caramel flavor to the cinnamon filling.
- Ground cinnamon: The star of the filling, bringing warmth and spice to each bite.
- Cream cheese: The base for the icing, providing a rich and tangy flavor.
- Unsalted butter: Adds creaminess to the icing; make sure it’s softened for easy mixing.
- Powdered sugar: Sweetens the icing and gives it that smooth, spreadable texture.
- Vanilla extract (for icing): Just a touch enhances the overall flavor of the icing.
For exact measurements, check the bottom of the article where you can find everything listed for easy printing. Happy baking!
How to Make Red Velvet Honeybun Cake with Cinnamon Cream Cheese Icing
Step 1: Preheat and Prepare
First things first, preheat your oven to 350°F (175°C). This step is crucial for getting that perfect rise. While the oven warms up, grab a 9×13 inch baking pan and grease it well. You can use cooking spray or butter to ensure the cake slides out easily later. Trust me, no one wants a cake disaster!
Step 2: Mix Dry Ingredients
In a large mixing bowl, combine the all-purpose flour, granulated sugar, baking soda, salt, and cocoa powder. Whisk them together until they’re well blended. This step is important because it ensures that the leavening agents are evenly distributed. A well-mixed dry mixture leads to a fluffy cake!
Step 3: Combine Wet Ingredients
In another bowl, mix together the vegetable oil, buttermilk, eggs, red food coloring, vanilla extract, and white vinegar. I love using a whisk for this part; it really helps to break up the eggs and blend everything smoothly. The vibrant red color will make you smile as you mix!
Step 4: Combine Wet and Dry Mixtures
Now, it’s time to bring the two mixtures together. Gradually pour the wet ingredients into the dry ingredients. Stir gently until everything is just combined. Be careful not to overmix; a few lumps are perfectly fine. This is where the magic starts to happen!
Step 5: Prepare Cinnamon Filling
In a small bowl, mix the brown sugar and ground cinnamon together. This filling is what makes the cake so special. The sweet, spicy aroma will fill your kitchen and make your mouth water. Set this mixture aside for layering later.
Step 6: Layer the Cake Batter
Pour half of the cake batter into the prepared pan, spreading it evenly. Then, sprinkle the cinnamon filling over the batter. Finally, pour the remaining batter on top, covering the filling completely. It’s like a surprise waiting to be discovered when you cut into the cake!
Step 7: Bake the Cake
Place the pan in the preheated oven and bake for 30-35 minutes. To check for doneness, insert a toothpick into the center. If it comes out clean or with a few moist crumbs, your cake is ready. The smell wafting through your home will be heavenly!
Step 8: Make the Cream Cheese Icing
While the cake is baking, let’s whip up the icing. In a mixing bowl, beat together the softened cream cheese, unsalted butter, powdered sugar, and vanilla extract until smooth and creamy. This icing is the cherry on top of your delicious cake, so make sure it’s fluffy and delightful!
Step 9: Ice the Cake
Once the cake has cooled completely, it’s time to spread that luscious cream cheese icing on top. Use a spatula to gently cover the entire surface. Don’t be shy; the more icing, the better! Your Red Velvet Honeybun Cake with Cinnamon Cream Cheese Icing is now ready to be devoured!
Tips for Success
- Make sure all your ingredients are at room temperature for better mixing.
- Don’t skip the greasing step; it prevents sticking and ensures a clean slice.
- Let the cake cool completely before icing to avoid melting the cream cheese frosting.
- For a fun twist, add chopped nuts or chocolate chips to the batter.
- Store leftovers in an airtight container to keep them fresh and moist.
Equipment Needed
- 9×13 inch baking pan: Essential for baking the cake; a round pan works too if you prefer.
- Mixing bowls: Use at least two; one for dry and one for wet ingredients.
- Whisk: Perfect for blending ingredients smoothly; a fork can work in a pinch.
- Spatula: Great for spreading icing and scraping down the sides of bowls.
- Toothpick: Handy for checking the cake’s doneness.
Variations of Red Velvet Honeybun Cake with Cinnamon Cream Cheese Icing
- Gluten-Free: Substitute all-purpose flour with a gluten-free blend to make this cake suitable for those with gluten sensitivities.
- Lower Sugar: Use a sugar substitute or reduce the granulated sugar and brown sugar for a lighter version without sacrificing flavor.
- Nutty Delight: Add chopped walnuts or pecans to the batter for a delightful crunch and added flavor.
- Chocolate Lovers: Mix in chocolate chips or use dark cocoa powder for a richer chocolate flavor in the cake.
- Spiced Up: Enhance the cinnamon filling with a pinch of nutmeg or allspice for an extra layer of warmth and spice.
Serving Suggestions for Red Velvet Honeybun Cake with Cinnamon Cream Cheese Icing
- Pair with a scoop of vanilla ice cream for a delightful contrast in temperature and texture.
- Serve alongside a steaming cup of coffee or tea to enhance the cake’s flavors.
- Garnish with fresh berries or a sprinkle of cinnamon for a pop of color.
- Present on a beautiful cake stand to impress your guests.
FAQs about Red Velvet Honeybun Cake with Cinnamon Cream Cheese Icing
Can I make this Red Velvet Honeybun Cake with Cinnamon Cream Cheese Icing ahead of time?
Absolutely! This cake actually tastes even better the next day. Just store it in an airtight container in the refrigerator. The flavors have time to meld, making each bite even more delightful!
What can I use instead of buttermilk?
If you don’t have buttermilk on hand, no worries! You can easily make a substitute by mixing one cup of milk with a tablespoon of vinegar or lemon juice. Let it sit for about 5 minutes, and you’re good to go!
How do I store leftovers of the Red Velvet Honeybun Cake?
To keep your cake fresh, store it in an airtight container in the refrigerator. It should last for about 3-4 days. Just remember to let it come to room temperature before serving for the best flavor!
Can I freeze this cake?
Yes, you can freeze the Red Velvet Honeybun Cake! Just wrap it tightly in plastic wrap and then in aluminum foil. It can be frozen for up to three months. Thaw it in the fridge overnight before serving.
What can I add to the icing for extra flavor?
If you want to jazz up the cream cheese icing, consider adding a splash of almond extract or a bit of lemon zest. Both will add a lovely twist to the classic flavor!
Final Thoughts
Making this Red Velvet Honeybun Cake with Cinnamon Cream Cheese Icing is more than just baking; it’s about creating memories. The joy of watching my family’s faces light up as they take that first bite is priceless. This cake is a warm hug on a plate, perfect for celebrations or a cozy night in. Whether you’re a seasoned baker or just starting, this recipe is a delightful adventure. So, roll up your sleeves, gather your loved ones, and let the sweet aroma fill your home. Trust me, you’ll be savoring every delicious moment!
Print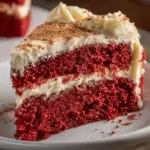
Red Velvet Honeybun Cake with Cinnamon Cream Cheese Icing will Delight Your Taste Buds!
- Prep Time: 20 minutes
- Cook Time: 35 minutes
- Total Time: 55 minutes
- Yield: 12 servings 1x
- Category: Dessert
- Method: Baking
- Cuisine: American
- Diet: Vegetarian
Description
A deliciously moist red velvet cake swirled with a cinnamon filling and topped with creamy cinnamon cream cheese icing.
Ingredients
- 2 cups all-purpose flour
- 1 1/2 cups granulated sugar
- 1 teaspoon baking soda
- 1 teaspoon salt
- 1 teaspoon cocoa powder
- 1 cup vegetable oil
- 1 cup buttermilk
- 2 large eggs
- 2 tablespoons red food coloring
- 1 teaspoon vanilla extract
- 1 teaspoon white vinegar
- 1/2 cup brown sugar
- 1 tablespoon ground cinnamon
- 8 oz cream cheese, softened
- 1/2 cup unsalted butter, softened
- 4 cups powdered sugar
- 1 teaspoon vanilla extract (for icing)
Instructions
- Preheat the oven to 350°F (175°C) and grease a 9×13 inch baking pan.
- In a large bowl, mix together the flour, sugar, baking soda, salt, and cocoa powder.
- In another bowl, combine the oil, buttermilk, eggs, food coloring, vanilla extract, and vinegar.
- Gradually add the wet ingredients to the dry ingredients and mix until well combined.
- In a small bowl, mix the brown sugar and cinnamon for the filling.
- Pour half of the cake batter into the prepared pan, sprinkle with the cinnamon filling, and then pour the remaining batter on top.
- Bake for 30-35 minutes or until a toothpick inserted in the center comes out clean.
- While the cake is baking, prepare the icing by beating together the cream cheese, butter, powdered sugar, and vanilla extract until smooth.
- Once the cake has cooled, spread the cream cheese icing on top.
Notes
- For a richer flavor, let the cake sit overnight before serving.
- Store leftovers in an airtight container in the refrigerator.
- Feel free to add nuts or chocolate chips for extra texture.
Nutrition
- Serving Size: 1 slice
- Calories: 350
- Sugar: 30g
- Sodium: 300mg
- Fat: 18g
- Saturated Fat: 8g
- Unsaturated Fat: 8g
- Trans Fat: 0g
- Carbohydrates: 45g
- Fiber: 1g
- Protein: 4g
- Cholesterol: 50mg